Sunday, 18 November 2012

Further improvements in lino printing

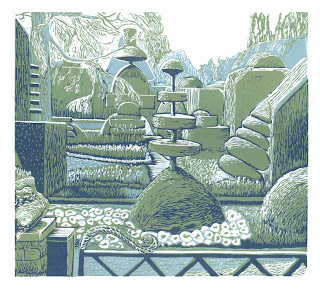
This is the 5th lino made so far, and I feel that improvements have been made and more understanding of the process.
The print is 30x40cm, and used 2 colours- blue-grey and black. I'm starting to grasp how its important to leave more lino on, so that the image doesn't look faint or thin in content. Also, larger lines make the foreground really jump forward. That might sound obvious but it really catches the eye and so jumps towards you. The last point is that I'm interested in creating movement of lines, as lino can look a bit jagged for some tastes, (which is what put me off years ago). 
6 standard prints were made, and then 3 experiments were done, in lighter inking, adding to the image later with a cotton bud and ink. I hope to work on top later with acrylic paint, just for the sake of experimenting.

After this lino print I'll return to some drawing and also drypoint. I bought some clear persex to play with, as multicoloured and multiplate printing is on the list of experiments.

Saturday, 27 October 2012

New lino print completed

Hi
my latest lino print is finished now, entitled 'Patience in Caffe Nero'. It's approximately 45x17cm, and was made with 2 seperate lino blocks. The first block is the colour stages, starting with light yellow, then medium brown, some selective areas of darker 'bronze' yellow, and finally a light grey/prussian blue. The second block is for the black lines and dark areas.


This was quite a detailed print to make, involving some things I had to practice, such as my cutting skills and how to make interesting textures. I also had to use a better registration method. Sticky tape to fix the paper to the mountboard wasn't working very well, with some paper slipping and also the tape came away from the paper and took the top layer off. Yuck. Instead I used a length of mountboard with an L shape attached to the 2ply frame (see wobbly diagram below).


This has given me some inspiration to do a print with more areas left uncut, as I quite like making the areas of colour a little speckled and seeing that texture mixed with the cut lines. Also the areas of blue against brown look kind of zigzaggy and are quite exciting, so has given me ideas of using bright colours against eachother.


Friday, 12 October 2012

Drypoint Wheelbarrows

Made in the last couple of days, this is a drypoint print of wheelbarrows under the trees at Levens Hall. It is 22.4 x 20cm and currently an edition of 4. The first print is on white paper and is quite a light image compared to the second. It has a graphic look to the marks, making them the print's point of interest. The latter is on soft white (cream) paper and has a warmer softer quality. In this way it's bringing out the tones and depth of the scene.


Surprising things always happen with drypoint. With this particular plate, the image can be given a very light wipe, which leaves a lot of ink on the plate. Interestingly when you have an area with no engraving and you leave what you think is more ink on it still seems to come up pale or even white. Also, I've taken Norman Ackroyd's tip and started to put the ink on with a roller, rather than scraping it on with a bit of card. This way there's less damage to the plate, and you don't end up in ink-hell having to scrape off loads of wasted ink.

PAPER SOAKING
Another tip is paper soaking. I have finally found a way to get the perfect condition of printing paper. Using Somerset Satin or Velvet 250gsm paper I soak it for 1hour, with the sheets on top of each other, then after letting all the water drip off place them as one stack between plastic (I use a portfolio plastic sleeve) underneath a heavy drawing board for 48 hours. It seems like a really long time, but it lets the water saturate every particle of paper evenly. Afterwards you can blot your paper well, and the paper should have the quality of flowing heavy silk.

PRE PRINTING
Just before printing you can flatten the paper a little bit more by running it through the press under a sheet or two of tissue paper. This will help the paper get into the lines of the plate more. And when printing you can put a sheet of tissue on top between the blankets and paper, this will help to get that little bit more detail but squashing the paper a tiny bit more.

I wish I had learned this earlier... Sometimes the air has turned blue after seeing a print on paper which hasn't been soaked long enough.

Sunday, 23 September 2012

Harrogate Open Exhbition


Hi,
I have 2 prints in the Harrogate Open Art Exhibition at the Mercer Gallery. I'm very pleased to have been selected as there are some of my friends and old tutors showing too.
The show runs from 16th September 2012 to 20th January 2013.


My first large lino

I have just finished a large (ish) lino print, 34x31cm. It is a 3 colour reduction lino. It was quite a challenge, and was done just for fun. I think in future single colour images will be made, the 3 colour reduction is a bit stressful, and I prefer the simplicity of just one colour having to do all the work.


Monday, 27 August 2012

Today's etching

This has been quite a leap forward in my printmaking today, making as a print an idea which has been floating around my head. When aquatint etching is done the usual method to block out the tones is with a brush and varnish, but after a quick experiment with a wax crayon I jumped into making a large print (50x34cm) with the same technique.

This is the experiment: Its only 10x15cm and was made for fun.


And then it started me thinking...


Picture 1 shows the simplicity of the tools used- limited varnish on sky and lightest areas (just to make sure they were absolutely white), a wax crayon for the rest of the picture. 


Picture 2- Each stage of tone was masked out with just the crayon, making a nice white image on the plate. The edges are nice and rough, I was expecting some cracking or the wax dropping off at some stage, but it seemed to stick to the zinc well. 


Picture 3- This is the first print, not perfect but gives me a good idea of how it should look. The wax had done exactly what I wanted- creating nice sketchy and rough edged marks. The varnish method of blocking out the acid resist gives a very sharp edge to the tones, but I wanted to break away from that and make a gritty texture to the marks. There is a much more loose and sketchy texture to the marks. 

I'm really looking forward to developing this technique and using it on potraits too. 

Wednesday, 8 August 2012

A couple of new drawings

I've returned from Levens Hall and taken lots of new photos, ten of which could become some very dramatic prints.
Here are a couple of drawings done in preparation. They are cc.23x20cm, and made with wax crayon resist, watercolour and Neocolour I crayon.


Wednesday, 1 August 2012

New topiary drawings for a future large etching.

After the exhbition organising I have finally got some more drawing done. They are studies for future prints. These drawings are from my sketchbook and are created as part of a discipline- while I draw ideas come and so I get a deeper understanding of my interest in the image.
I'm enjoying working with wax resist to make lots of texture for the image, which will be carried onto a print. In my mind there will be a large print using just aquatint and wax resist, so these sketches are helping to solidify the ideas and imagery.

Each drawing is approximately 25x20cm.


Tuesday, 10 July 2012

Gray's Court Print

This is the latest print, of Gray's Court in York. Its an etching with added detail, and is 30x30cm.
Although a beautiful building dating back to the Middle Ages, I couldn't resist giving it a gothic quality in mood. The longer you look at the trees the more spooky they appear. I wanted a rough textured quality to the marks, especially on the trees and cobbled floor. Also the doorway is a dark entrance with the white woodwork surrounding it, and so became the focal point of the image. 
Here's a link to an earlier drawing made in 2010, so I could 'understand' what attracted me to the trees and court:
http://rebeccawright-drawing.blogspot.co.uk/2010/06/scary-pollarded-trees.html

You can find out more info about the building here:
http://www.grayscourtyork.com/about/


Saturday, 7 July 2012

Work at the West Yorkshire Print Workshop

I have more exhibition news, my work will be shown at the WYPW as part of Printmakingonline. The show runs from Saturday 21 July to Saturday 18 August. It is held at the West Yorkshire Print Workshop in Mirfield, near Leeds and Wakefield.

http://www.wypw.org/about_west_yorkshire_print_workshop.html

http://www.printmakingonline.co.uk/

Friday, 22 June 2012

The Great North Art Show 2012

Good news, I have been selected to exhibit at the Great North Art Show in Ripon.
Here's the information and website for the event:

http://www.greatnorthartshow.co.uk/exhibition2012.html

It runs from 1st - 23rd September, in Ripon Cathedral.


Drypoint using a Dremel

Here's the next drypoint, and I used a new tool, the Dremel Hobby Engraver, for the darkest tones.
The engraver creates really deep dotted pits in the zinc, which hold an amazing amount of ink, which in turn makes for fantastic fuzzy and rich black tones. I'd been looking into trying to make tones very dark and asked a fellow printmaker (Emerson Mayes) what he used. So after buying safety glasses (because I thought metal would be flying everywhere), I started on this piece.
Its from a drawing made last year in my old suburb Crouch End, and is the outside seating area at the Spiazzo diner. It is 37x15cm. I've made an edition of 20, and may be exhibiting it later this year.


Afterwards I added watercolour to one of the lighter prints to see how it would look with colour. It came out 'cute'. Sometimes I like a bit of cute, its relaxing.

Thursday, 7 June 2012

The Big Drypoint

As promised the large 45x18cm drypoint of Levens Hall Gardens has been printed. It took 3 days to engrave and 2 days to print to my satisfaction. I used as many different marks as possible, from soft feathery thin lines to thick fuzzy black ones, stopping off at stipples on the way.

It's turning out to be a good way to make prints. I'm excited at the possibilities of using it for portraits, and may also buy some carborundum grit to make really dark black tones for big scary shadows.


Wednesday, 30 May 2012

Studies for future prints

Here are two new drawings to be made into drypoint prints.


I've discovered that drypoint is a really enjoyable way to make images, as it's very versatile. You can gently engrave with the etching needle to make soft light lines or gouge in hard and make big fat fuzzy lines or areas. Sandpaper can also be used- by rubbing on the metal to make a light grey tone, and also sticking it down to hold the ink just like a dark aquatint would. You can also make nice little stubble marks by either lightly or heavily pricking the surface with the needle. I'm hoping to use all these methods on the future prints. 
If you've just found this blog and wondering what on earth I'm talking about here's a link to a drypoint print to explain:
http://rebeccawright-drawing.blogspot.co.uk/2011/10/drypoint-print.html


Tuesday, 10 April 2012

Mannion's & Co, York

These are a couple of drawings made in the lovely Mannion's & Co café in York. They take great pride in baking, so I was inspired to do some drawings of their bread on display. There is another room behind the main area which is like scenery in Alice in Wonderland- the panelled walls are bowing inwards under the weight of the building, and willow hearts are hung above, with teapots on victorian tables completing the picture. All it needs now is a lizard falling down the fireplace.


Here's a link to the café if you're ever in York:
http://www.mannionandco.co.uk/index.html

Workspaces

Here are a couple of workspace pictures. The first is my Mum's pottery (which has most of Britain's paintbrushes in little pots and buckets), and the second is my own studio (art material and magazine dumping ground, and design studio). They are both c50x20cm on Khadi paper.


Easter spring

Hello, it's been a while, no entry for March? Shocking. I've been very busy working on an illustration commission for a publisher so had absolutely no time for my own drawings. Now it's back to a bit of spare time and a chance to get thinking about artwork again. 
The first painting is a response to the new blossom in the garden, made with watercolour on Khadi paper. The second is something I've always wanted to do- a watercolour drawing of shadows on the gently waving washing.


Thursday, 9 February 2012

Snowy Britain

Hi,
as it was a beautiful afternoon, turning to evening, the sun was surrounded by pink and yellow light. The trees were hiding behind a veil of frozen mist and the roofs looked like little pyramids in the sun.

So I made an iPad drawing of it.

Tuesday, 31 January 2012

Lino madness

Hi
this is the latest print, and first lino done since school. Its 12" and an intentionally rough print, as the subject is a rather bohemian bar in York called Evil Eye Lounge. If you know this blog you'll notice that I like the place enough to do lots of drawings or prints of the place. I hasten to add that I don't get there as much as desired...
The first is a more experimental version, the second being a more traditional straight version. Guess which one was more fun to make. ;-)  The black ink was pushed around with a cotton bud and scratched with a sharp edge. I did the same with the colour layers underneath. It was made purely as a labour of love, just to explore things and maybe develop skills. If there was anything learned from this its that experimentation is the way I'd like to work for a while.


Saturday, 28 January 2012

iPad art

This is a new direction since buying an iPad (after drooling and deliberation). The app used is Brushes. Its such a great way to lay colour down quickly and the emphasis is on colour as its so brilliant at all the subtle choices and changes in tone and hue. I've chosen not to try and be super realistic, but rather work with the colour side of it and try to be simple in style, working instinctively.
Here's the Brushes site:


Coloured versions of earlier post

Hi, as promised, here are the coloured versions of the drawings in the previous post. I coloured them with watercolour, then Neocolor I wax crayon.

Wednesday, 25 January 2012

Getting back into drawing- domestic bliss

These are two 40x20cm sized pen drawings of my backroom, where I do my artwork. I'm hoping to colour them, with either crayon or watercolour, then they'll be posted again so you can see how they came out. 

The first picture of the chairs is to show how things are set out, and I've just realised that the two chairs are pointing in opposite directions, creating a kind of connection and symmetry. Could I have maybe finally trained my subconscious to lead my eye and hand in composition?


The second drawing is a squewed view of looking down at the sketchbook and sofa. I was having really bad creative block after new year (hence the empty page), so forced myself to start drawing again. This picture will be developed with colour, which should help with figuring out the lay of the land, as its quite confusing at the moment. The carpet is light green, the same as the stripes on the blanket on the sofa, so things will start linking together.

Long time no blogging

Hi, happy new year everyon. I'm back now, after illustration projects and the festivities. Let the drawings and prints commence.